Categories, subcategories and other filters
Before uploading products, travels, accommodations, news or any other form, it is good to define the categories and insert them.
Manage categories
Categories with image and text
The categories allow you to divide your catalog into sections and allow the navigator to quickly locate
the product you are looking for,
avoid displaying multiple different products, thus avoiding the user losing time unnecessarily on your website and abandoning it,
are also indispensable in order to achieve a good search engine.
The CMS allows you to create categories, categories 2, categories 3, subcategories, subcategories 2 and subcategories 3 for all modules.
Brands (Module products and cars), typologies (accommodations, real estate and companies).
Specific filters for the real Estate module and cars module
Geographic filters (region, province, location, coordinates) for travels, accommodations, real estate, companies and events.
In addition, CMS allows you to create new filters and attributes and customize the search engine and your catalog.
Go to the cleaner MODULES > PRODUCTS > CATEGORIES
Click the Categories button and sign in to the list. Click the New Category button and enter the product categories.
The same applies to subcategories, categories 2, categories 3, subcategories 2 and subcategories 3.
Categories will be present in your site navigation bar under products, search engines, and sidebar (if enabled).
Ex: category view in the horizontal web site menu
web site search engine
vertical web site menu
In this image of a homepage were placed in the center of the page categories with images and title:
art and culture, cinema, hotels, etc ...
This way the navigator user can immediately understand what the website offers and what the content is.
After entering the category name, continue with the insertion
preview text and description text (optional).
Click the INSERT button and return to the list of categories you have entered.
In the list of categories, click the Photo button
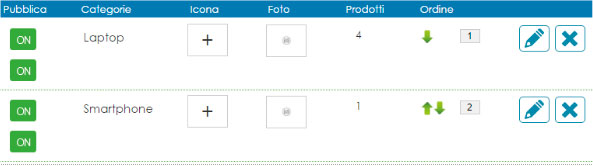
and upload an image from your PC.
You can also enter an icon for the category. Click the Icon button
and select an icon from the available ones.
You can also upload custom icons from your PC.
After creating the categories and inserting the reference image, icon and text, go back to the website to graphically customize the template and view the categories that are included.
If you have a browser window already open on the web site, go back to that window, otherwise from the CMS click on the bottom left button (in the corner) GO TO THE WEB SITE.
Once on the website, click on the MODULE button in the left menu, then click the Products button or the form you need, then the Add Category Container button:
The category container is displayed on your website page, with the boxes to be customized.
Repeat the procedure used to customize the Products container for
customize the category graphics.